
What is Dreambooth and how does it work?
Written on . Posted in Image Generation.
Do you struggle to find tools that can consistently generate personalized images with the exact characteristics you need?
In this article, you'll learn all about DreamBooth, its features, advantages, applications, and how it can help you create custom images that stay true to the unique features of your subject, no matter the style or setting.
What is DreamBooth?
DreamBooth is a fine-tuning technique developed by researchers at Google for personalizing text-to-image diffusion models, specifically aimed at creating customized image generations based on a given subject.
Unlike standard text-to-image models that may struggle to consistently recreate specific subjects in different contexts, DreamBooth can adapt a model to generate images of a particular subject (like a specific face, character, pet, or object) across diverse settings, poses, and styles while preserving unique features of the subject.
This innovation has opened doors to a new level of personalized image creation, ideal for content creators, artists, and brands seeking custom visuals.
Read our handy blog article about model training.
How DreamBooth Works?
DreamBooth uses a few key steps to ensure high-quality, consistent image generation based on a particular subject. Here’s a breakdown of how the process works:
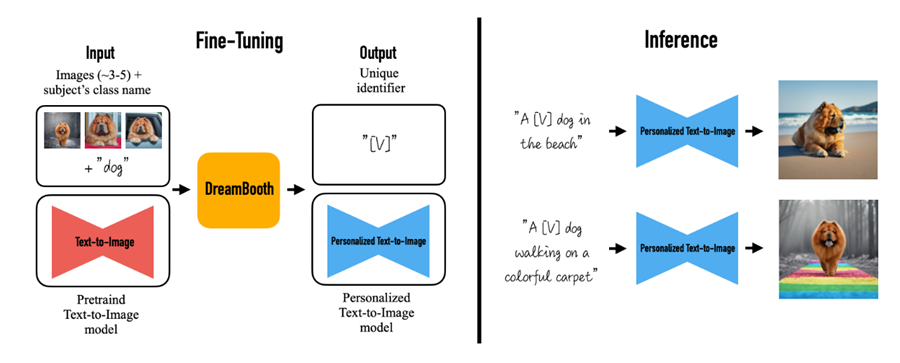
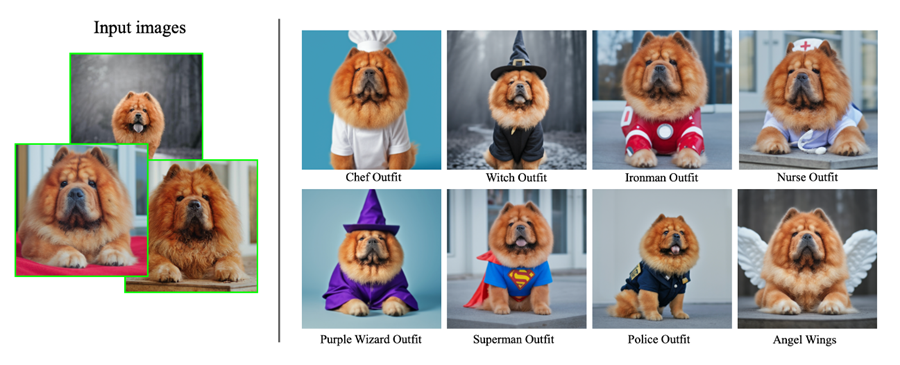
Step 1: Input Images and Fine-Tuning
The process starts with around 3-5 images (10-12 is a good number) of the subject (e.g., a unique face, character, pet, or object). These images are used to fine-tune a pre-trained text-to-image model, binding a unique identifier to that subject. This identifier allows the model to recognize and recreate the subject in new prompts.
Step 2: Class-Specific Prior Preservation
Class-Specific Prior Preservation in DreamBooth ensures that while the model learns specific details about a particular subject (like a dog or a cat), it still retains its general understanding of the broader category to which that subject belongs.
For example, if the model is trained on a specific dog, it will remember what makes a dog a dog, even if it's learning about just one specific dog breed. This allows the model to generate a variety of images that stay true to the subject’s category (like creating images of different dogs or cats) while maintaining unique details about the specific subject.
It helps the model produce more diverse outputs, all while staying true to the general characteristics of the class (like "dog" or "cat").
Step 3: Capture details with reproduction
By fine-tuning both low-resolution and high-resolution components of the model, DreamBooth captures intricate details of the subject, making it possible to render high-quality, photorealistic, or stylized images.
Also, you can focus on these things to get more consistent results:
Aspect Ratio: Ensure that the aspect ratio of your images matches the pre-trained Stable Diffusion model you're using. Consistency in aspect ratios streamlines the fine-tuning process.
Image Resizing: Use online tools like 'big image resizing made easy' (birme.net) to easily resize and crop your images to the desired aspect ratio.
File Naming: After resizing, rename your image files using a consistent prefix that represents your concept. This helps Dreambooth differentiate your concept from others during training.
We already have plenty of trained models available for you. Simply add the model ID, and you’ll be ready to use them.
You can try the available endpoints in our Playground section for free, just make sure to sign up first.
Key Features of DreamBooth AI
DreamBooth AI brings an impressive set of features to personalize and improve image generation:
Personalized Image Generation
DreamBooth uses specific images of your subject to create visuals directly inspired by them, making it perfect for unique avatars, custom art, or branded visuals.
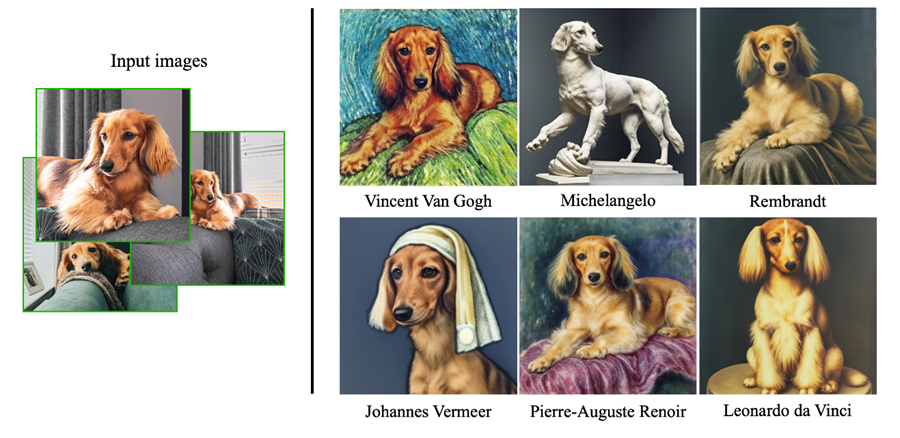
Artistic Style Transformation
DreamBooth can apply a range of artistic styles, from impressionist to surreal art, allowing creative experimentation with your subject’s image.
Accessory and Outfit Addition
DreamBooth’s “Accessorization” feature can seamlessly add accessories or clothing to images, popular among pet owners and influencers for themed images.
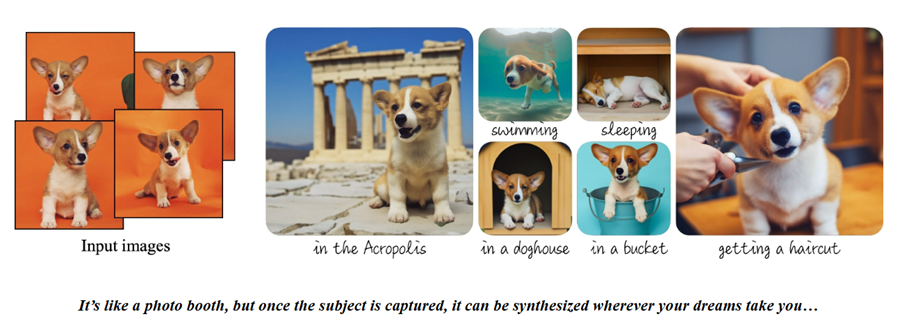
Text-Guided View Synthesis
With text prompts, DreamBooth AI can adjust to various poses or angles, offering flexibility in visual presentation.
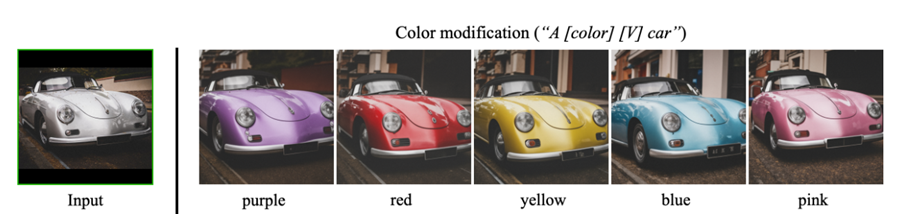
Property Modification
Users can modify attributes like colors and textures, creating hybrid effects or playful, realistic images.
Key Advantages of DreamBooth
DreamBooth offers unique advantages, enabling artists, content creators, and individuals to generate images that preserve the identity and uniqueness of specific subjects. Here’s what sets it apart:
Personalization and Specificity
Unlike traditional diffusion models like DALL-E or Stable Diffusion, which struggle to capture and reliably reproduce unique visual features, DreamBooth can faithfully replicate specific details of unique subjects.
For example, DreamBooth allows consistent image generation of a pet or heirloom across various settings, embedding a unique identifier that helps the model recognize and recreate the subject's distinctive characteristics in new contexts.
Flexibility and Variations
DreamBooth allows users to place a subject into new environments or create variations that weren't in the original images. This allows creative freedom, whether it’s reimagining a pet in different costumes or placing a unique object in various artistic styles.
Traditional models would require extensive prompt engineering and might still fall short of maintaining subject fidelity.
Creates Realistic and Detailed Images
DreamBooth’s fine-tuning method Improves detail retention, enabling realistic and nuanced images that capture both small details and larger features accurately, even in novel environments, poses, and lighting conditions.
This makes DreamBooth invaluable for applications where visual consistency and realism are paramount, such as marketing, content creation, and digital art.
Creative Control for Artists and Content Creators
DreamBooth helps creators include unique subjects in their projects while keeping their essence intact. Artists can maintain a consistent "character" across different scenes, which is key for creating cohesive stories or themed content.
Unlike traditional models, which treat each prompt separately, DreamBooth offers more control and consistency in creative work.
Applications in Product Design and Branding
DreamBooth allows businesses to create consistent visual assets by incorporating specific products or logos into various contexts.
For example, a company can place a brand mascot or product into different scenes for marketing materials while keeping it recognizable. This level of personalized, consistent image generation is difficult to achieve with standard models.
Stable Diffusion vs. Dreambooth: Key Differences
Here are the key differences between Stable Diffusion and Dreambooth:
Feature | Stable Diffusion | Dreambooth |
Personalization | Lacks personalization capabilities | Designed for personalization and customization of image generation |
Training Data | Requires a large dataset for training | Requires a significantly smaller dataset for fine-tuning (10-12 Images) |
Concept Adaptation | Not easily adaptable to specific concepts | Allows for the generation of images with specific subjects in various contexts |
Use Cases | General image generation based on text prompts | Creating personalized images featuring specific subjects or styles |
Exploring Advanced Techniques: LoRA, SDXL, and DeepFloyd IF
As you explore DreamBooth, you may come across more advanced techniques that can expand its capabilities. Here’s a brief overview of three such methods:
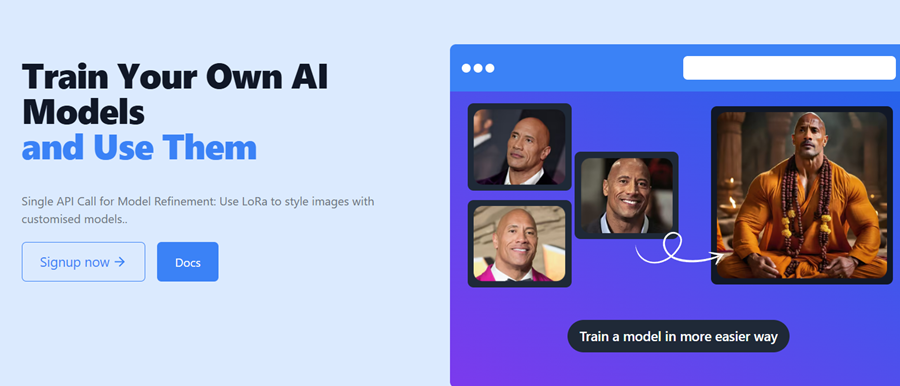
LoRA (Low-Rank Adaptation): LoRA is a training technique that reduces the number of trainable parameters in a model, leading to faster training times and smaller model sizes (around 100MB). The train_dreambooth_lora.py script in the Diffusers library lets you train DreamBooth models using LoRA.
Stable Diffusion XL (SDXL): SDXL is an upgraded text-to-image model that generates high-resolution images with greater detail. It includes a second text encoder, improving its ability to understand and interpret text prompts. You can train SDXL models with LoRA using the train_dreambooth_lora_sdxl.py script.
DeepFloyd IF: DeepFloyd IF is a cascading pixel diffusion model that works in three stages to create high-resolution images (1024x1024). The first stage generates a base image, while the other two progressively upscale it. You can train DeepFloyd IF models using LoRA or by training the full model with the train_dreambooth_lora.py or train_dreambooth.py scripts.
Practical Applications of DreamBooth
Here are some of the applications for Dreambooth:
Avatar Creation for Social Media
DreamBooth’s ability to generate realistic avatars makes it ideal for influencers, social media users, and gaming enthusiasts, creating stylized avatars that reflect personal appearance and personality.
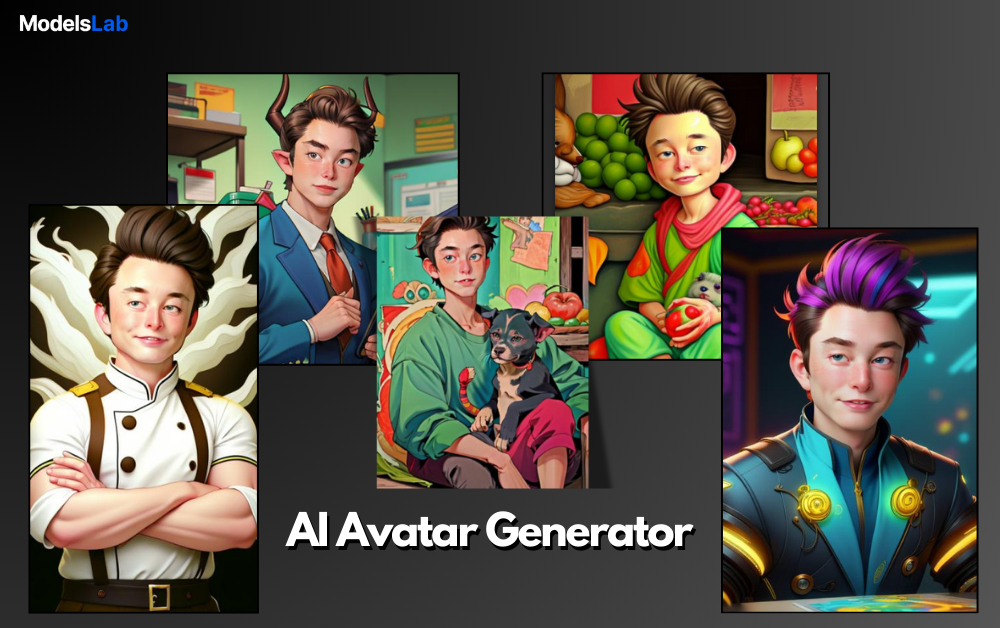
Looking to save time and create your unique avatars? Read more about Our AI Avatar Generator!
Pet Photography and Art
Pet owners can use DreamBooth to create artistic portraits of their pets, adding accessories, or create themed artwork as a fun, low-cost alternative to traditional pet photography.Digital Art and Concept Design
Digital artists and concept designers can quickly ideate and prototype with DreamBooth, visualizing concepts without spending hours on manual sketches.Marketing and Branding
DreamBooth AI allow companies to add a unique touch to marketing visuals, including brand mascots, product images, or themed visuals that align with specific campaigns.
Using DreamBooth and Stable Diffusion Together
DreamBooth pairs perfectly with the Stable Diffusion API, as they complement each other’s strengths. DreamBooth adds personalized elements to images, while Stable Diffusion improves image quality and refines details.
If you’re interested in creating custom AI avatars, check out our guides on "How to Generate AI Avatars with Stable Diffusion API" and "How to Fine-tune a DreamBooth Model." These resources will guide you through the steps to maximize the potential of both tools, helping you create personalized images and avatars that bring your vision to life.
DreamBooth Finetuning API by ModelsLab
Our DreamBooth Finetuning API allows you to train models with custom images, allowing personalization for any object or person. These key endpoints include training with custom images, checking training status, canceling requests, and managing models. You can also upload and crop Base64 images and train Lora models for improved customization.
Still feeling confused? Reach us out on Discord!
Final Thoughts
DreamBooth offers a powerful way to generate customized images with your unique subjects, whether you're an artist, content creator, or business. By fine-tuning a model to recognize specific details, DreamBooth helps you create images that stay true to your vision, no matter how the subject is placed or posed.
If you want to bring your ideas to life with personalized, high-quality visuals, DreamBooth is an excellent tool to consider.
Ready to get started? Check out the DreamBooth documentation for a step-by-step guide and begin creating your own personalized images today!
FAQs
What is DreamBooth?
DreamBooth is a technique that allows you to create personalized images by fine-tuning a model to recognize and generate specific subjects, like pets, objects, or characters, in various settings and styles.
How is DreamBooth different from other image models?
Unlike other models that may have trouble consistently recreating a subject, DreamBooth ensures that the subject’s unique features are preserved, even in different poses or environments.
How many images do I need to use DreamBooth?
You typically need 3-5 images of the subject (ideally 10-12) to train the model to recognize and generate images based on those details.
Can I use DreamBooth with other Image generation tools?
Yes, DreamBooth works well with tools like Stable Diffusion. While DreamBooth handles personalization, Stable Diffusion can enhance the image quality and details.
What kinds of images can DreamBooth create?
DreamBooth can create a wide range of images, from personalized avatars and pet photos to marketing visuals and product designs, all tailored to your specific subject.
Do I need special skills to use DreamBooth?
While DreamBooth does involve some technical steps, like resizing images, it’s beginner-friendly, and there are guides available to help you get started.